This article will describe building Fuchsia and debugging with GDB-stub. The arm32 has a problem with deadlock of spin_lock on 2016/8.
Table of Contents
1 Run Fuchsia
Run Fuchsia with magenta/docs/getting_started.md.
1.1 Download
Download Fuchsia from repository.
$ git clone https://fuchsia.googlesource.com/magenta
1.2 Install packages
Install packages for building Fuchsia.
$ sudo apt install -y texinfo libglib2.0-dev autoconf libtool \
libsdl-dev build-essential
1.3 toolchain
Download toolchain.
$ ./scripts/download-toolchain
This will be stored at prebuilt/downloads.
$ ls prebuilt/downloads/
aarch64-elf-5.3.0-Linux-x86_64    arm-eabi-Linux-x86_64.tar.bz2
aarch64-elf-Linux-x86_64.stamp    x86_64-elf-5.3.0-Linux-x86_64
aarch64-elf-Linux-x86_64.tar.bz2  x86_64-elf-Linux-x86_64.stamp
arm-eabi-5.3.0-Linux-x86_64       x86_64-elf-Linux-x86_64.tar.bz2
The GDB in prebuilt/downloads does not have layout command. This article will use layout command and build toolchain. Building toolchain will take about 2 hours.
$ sudo apt build-dep -y gcc gdb
$ git clone https://fuchsia.googlesource.com/third_party/gcc_none_toolchains
$ cd gcc_none_toolchains
$ ./doit -a 'arm aarch64 x86_64' -f
$ cd ..
1.4 Build
Build binary of target board with make.
$ make <target>
The binary will be stored at build-<target>.
build-<target>
This article will use magenta-pc-x86-64
$ make magenta-pc-x86-64
The list of <target> is as below. Running make without target will use magenta-pc-x86-64.
$ make list
List of all buildable projects: (look in project/ directory)
qemu-virt-a53-test
rpi3-test
magenta-pc-x86-64
pc-x86-64-test
magenta-qemu-arm32
pc-x86-test
qemu-virt-a15-test
magenta-qemu-arm64
1.5 QEMU
The QEMU in Fuchsia's repository has few patches. Build QEMU in Fuchsia's repository and install it.
$ sudo apt build-dep -y qemu
$ git clone https://fuchsia.googlesource.com/third_party/qemu
$ mkdir qemu.build
$ cd qemu.build
$ ../qemu/configure --target-list=arm-softmmu,aarch64-softmmu,x86_64-softmmu
$ make && sudo make install
Run QEMU with script.
$ ./scripts/run-magenta-x86-64
The arguments of script are as below.
$ ./scripts/run-magenta-x86-64 -h
help:
-a <arch>           : arm32, arm64, or x86-64
-b                  : build first
-c                  : add item to kernel commandline
-d                  : run with emulated disk
-g                  : use graphical console
-k                  : use KVM
-m <memory in MB>   : default 512MB
-n                  : run with emulated nic
-N                  : run with emulated nic via tun/tap
-o <dir>            : build directory
-r                  : run release build
-u                  : use uniprocessor
-v                  : use vnc based display
-x <bootfs>         : add eXtra bootfs
-h for help
all arguments after -- are passed to qemu directly
2 Debug with GDB-stub.
This article will debug kernel and uapp with GDB-stub.
2.1 QEMU
Change QEMU script as below.
diff --git a/scripts/run-magenta b/scripts/run-magenta
index 555c64d..e1102ae 100755
--- a/scripts/run-magenta
+++ b/scripts/run-magenta
@@ -22,6 +22,7 @@ function HELP {
     echo "-u                  : use uniprocessor"
     echo "-v                  : use vnc based display"
     echo "-x <bootfs>         : add eXtra bootfs"
+    echo "-G <port>           : gdb port"
     echo "-h for help"
     echo "all arguments after -- are passed to qemu directly"
     exit 1
@@ -43,8 +44,9 @@ RELEASE=0
 VNC=0
 INITRD=
 CMDLINE=""
+GDBPORT=""

-while getopts a:Abc:dgkm:nNo:ruvx:h FLAG; do
+while getopts a:Abc:dgkm:nNo:ruvx:G:h FLAG; do
     case $FLAG in
         a) ARCH=$OPTARG;;
         A) AUDIO=1;;
@@ -61,6 +63,7 @@ while getopts a:Abc:dgkm:nNo:ruvx:h FLAG; do
         u) UP=1;;
         v) VNC=1;;
         x) INITRD=$OPTARG;;
+        G) GDBPORT=$OPTARG;;
         h) HELP;;
         \?)
             echo unrecognized option
@@ -189,6 +192,11 @@ if [ "$INITRD" != "" ]; then
     ARGS+=" -initrd $INITRD"
 fi

+# gdb port
+if [ "$GDBPORT" != "" ]; then
+    ARGS+=" -gdb $GDBPORT -S"
+fi
+
 # run qemu
 echo $QEMU $ARGS -append "$CMDLINE" $@
 $QEMU $ARGS -append "$CMDLINE" $@
Run QEMU with -G option.
$ ./scripts/run-magenta-x86-64 -G tcp::10000
2.2 GDB
x86_64-elf-5.3.0-Linux-x86_64/bin/x86_64-elf-gdb will cause below error.
Remote 'g' packet reply is too long: 000000000...
This article will use gdb64 in Ubuntu 16.04 because it will not cause error.
$ sudo apt install -y gdb64
Use the following GDB script.
$ cat gdb.x
symbol-file build-magenta-pc-x86-64/magenta.elf
set architecture i386:x86-64
target remote localhost:10000
b lk_main
la src
c
Run GDB with script.
$ gdb64 -x gdb.x
In case of scripts/run-magenta-arm64, please use gcc_none_toolchains/aarch64-elf-5.3.0-Linux-x86_64/bin/aarch64-elf-gdb.
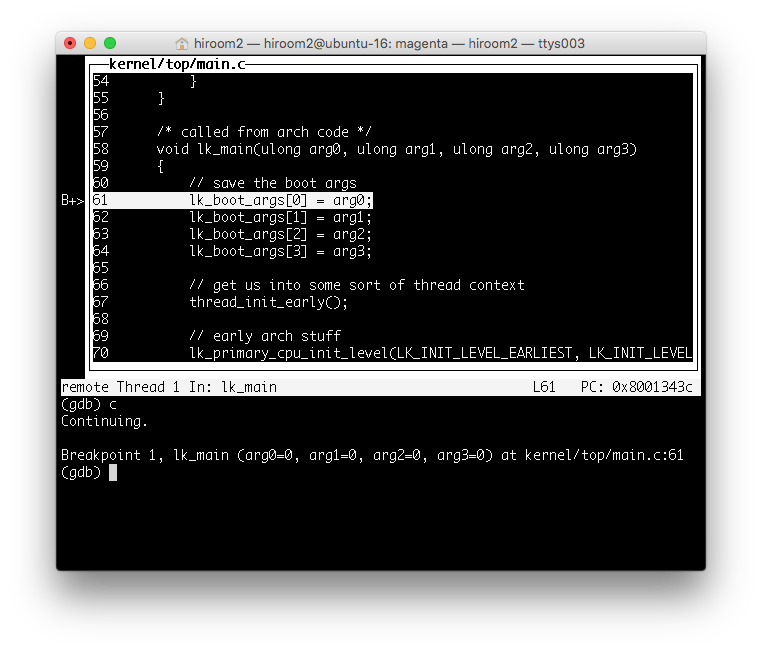
2.3 Execution result
After running arch-depend assembler, lk_main function will be called.
kernel/arch/xxx/xxx/start.S -> lk_main at kernel/top/main.c
GDB break at lk_main as below.
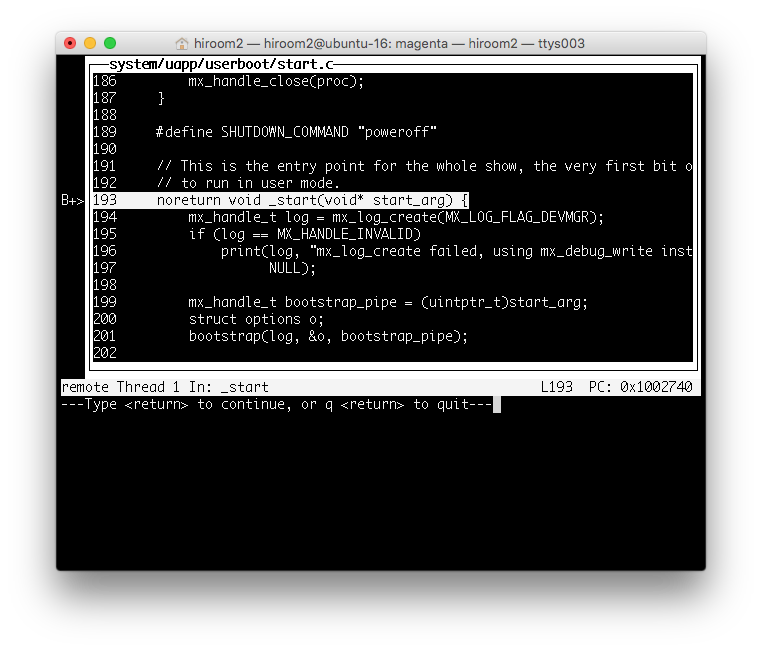
2.4 Debug userboot with GDB-stub
The userboot is a program running from kernel to userspace. This looks like init programe in Linux.
bootstrap2 (kernel) -> userboot_init (kernel) -> userboot (uapp) -> ... -> bin/mxsh (uapp)
The load address of userboot (uapp) will be output.
[00001.069] K userboot: userboot-code 0x2000 @ [0x1002000,0x1004000)
Add userboot (uapp) symbol with add-symbol-file in GDB script.
$ cat gdb.x
symbol-file build-magenta-pc-x86-64/magenta.elf
set architecture i386:x86-64
target remote localhost:10000
add-symbol-file build-magenta-pc-x86-64/uapp/userboot/libuserboot.so 0x1002000
b _start
la src
c
When running QEMU and GDB, GDB break at _start function in userboot (uapp) as below.
It might be enable to debug bin/devmgr if knowing load address (This article cannot get load address).