ウェブベースのコードレビューツールであるgerritのインストール方法について記載します。この記事で使用するgerritサーバのホスト名はubuntu-16.04-gerrit.hiroom2.comです。
Table of Contents
1 gerritサーバ側の設定
Ubuntu 16.04でgerritサーバを動作させる為の設定を記載します。
1.1 gerritパッケージのインストール
gerritパッケージをインストールします。
$ sudo apt install -y openjdk-8-jdk
$ sudo su -c 'echo "deb mirror://mirrorlist.gerritforge.com/deb gerrit contrib" \
> /etc/apt/sources.list.d/gerritforge.list'
$ sudo apt-key adv --keyserver keyserver.ubuntu.com --recv-keys 1871F775
$ sudo apt-get update -y
$ sudo apt-get install -y gerrit
$ sudo systemctl enable gerrit
$ sudo systemctl start gerrit
ブラウザから以下のURLにアクセスすることでgerritに接続できます。
http://<server>:8080
1.2 TCPポートの変更
デフォルトのポートは8080です。他のサービスと重複する場合は以下のように変更します。
なお、canonicalWebUrlのドメイン名はページ遷移で使われるので、外部からアクセスできるものにしてください。IPアドレスでも良いです。デフォルトだとドメイン名はホスト名が設定されています。
$ diff -uprN /etc/gerrit/gerrit.config{.org,}
--- /etc/gerrit/gerrit.config.org       2016-07-25 19:59:41.598934505 +0900
+++ /etc/gerrit/gerrit.config   2016-07-25 19:59:55.114798625 +0900
@@ -1,6 +1,6 @@
 [gerrit]
        basePath = git
-       canonicalWebUrl = http://ubuntu-16.04-gerrit.hiroom2.com:8080/
+       canonicalWebUrl = http://ubuntu-16.04-gerrit.hiroom2.com:8081/
 [database]
        type = h2
        database = db/ReviewDB
@@ -13,7 +13,7 @@
 [sshd]
        listenAddress = *:29418
 [httpd]
-       listenUrl = http://*:8080/
+       listenUrl = http://*:8081/
 [cache]
        directory = cache
 [receive]
gerritを再起動します。
$ sudo systemctl restart gerrit
ブラウザから以下のURLにアクセスすることでgerritに接続できます。
http://<server>:8081
1.3 Apache2を利用する
<server>:<port>ではなく、<server>/gerritでアクセスできるようにApache2を利用するようにします。また、URLアクセスにダイジェスト認証を利用するようにします。
gerritでApache2を利用するようにします。
$ diff -uprN /etc/gerrit/gerrit.config{.org,}
--- /etc/gerrit/gerrit.config.org       2016-07-25 20:02:36.845106678 +0900
+++ /etc/gerrit/gerrit.config   2016-07-25 20:03:24.788584852 +0900
@@ -1,6 +1,6 @@
 [gerrit]
        basePath = git
-       canonicalWebUrl = http://ubuntu-16.04-gerrit.hiroom2.com:8081/
+       canonicalWebUrl = http://ubuntu-16.04-gerrit.hiroom2.com/gerrit
 [database]
        type = h2
        database = db/ReviewDB
@@ -13,7 +13,7 @@
 [sshd]
        listenAddress = *:29418
 [httpd]
-       listenUrl = http://*:8081/
+       listenUrl = proxy-http://127.0.0.1:8081/gerrit
 [cache]
        directory = cache
 [receive]
gerritを再起動します。
$ sudo systemctl restart gerrit
Apache2をインストールします。
$ sudo apt install -y apache2
Apache2にgerrit用の設定ファイルを追加します。
- proxy_httpでTCPポート8081のサービスを/gerritでアクセスできるようにします。
- auth_digestでURLのアクセスにダイジェスト認証を使います。
- nocanonを付けることで、path/to/src.cのようにスラッシュを持つソースコードにアクセスできるようにします。
$ sudo su -c 'cat << EOF > /etc/apache2/mods-enabled/gerrit.conf
ProxyPass           /gerrit  http://localhost:8081/gerrit nocanon
ProxyPassReverse    /gerrit  http://localhost:8081/gerrit nocanon
ProxyRequests       Off

<Proxy http://localhost:8081/gerrit>
  Order deny,allow
  Allow from all
</Proxy>

<Location /gerrit>
  AuthType Digest
  AuthName "gerrit"
  AuthUserFile /etc/apache2/.htdigest
  Require valid-user
</Location>
EOF
'
ダイジェスト認証のファイルを作成します。
$ sudo htdigest -c /etc/apache2/.htdigest "gerrit" hiroom2
Adding password for hiroom2 in realm gerrit.
New password:
Re-type new password:
gerritはスラッシュの代わりに%2Fを使うページがあります。VirtualHostディレクティブ内部でAllowEncodedSlashesをOnにします。
$ diff -uprN /etc/apache2/sites-available/000-default.conf{.org,}
--- /etc/apache2/sites-available/000-default.conf.org   2016-07-25 20:21:33.160757290 +0900
+++ /etc/apache2/sites-available/000-default.conf       2016-07-25 20:21:52.892879066 +0900
@@ -26,6 +26,8 @@
        # following line enables the CGI configuration for this host only
        # after it has been globally disabled with "a2disconf".
        #Include conf-available/serve-cgi-bin.conf
+
+       AllowEncodedSlashes On
 </VirtualHost>

 # vim: syntax=apache ts=4 sw=4 sts=4 sr noet
proxy_httpとauth_digestを有効にして、Apache2を再起動します。
$ sudo a2enmod proxy_http auth_digest
$ sudo systemctl restart apache2
2 管理ユーザの追加
HTTPでアクセスできる管理ユーザを作成します。以下の手順で管理ユーザを追加します。
- クライアント側でSSHの公開鍵を作成する
- gerritのユーザ認証をHTTPに変え
- URLにアクセスしてユーザを作成する
- gerritのユーザ認証をDEVELOPMENT_BECOME_ANY_ACCOUNTに変え、
- ユーザをAdministratorsグループに所属させる
- gerritのユーザ認証をHTTPに変える
- SSH経由でemailを登録する
- 以降は管理ユーザでユーザを管理する
gerritクライアントでSSHの公開鍵を作成します。すでに公開鍵を持っている場合はそちらを利用してください。
$ ssh-keygen -t rsa
Generating public/private rsa key pair.
Enter file in which to save the key (/home/hiroom2/.ssh/id_rsa):
Enter passphrase (empty for no passphrase):
Enter same passphrase again:
Your identification has been saved in /home/hiroom2/.ssh/id_rsa.
Your public key has been saved in /home/hiroom2/.ssh/id_rsa.pub.
<snip>
$ cat .ssh/id_rsa.pub
ssh-rsa AAAAB3NzaC1yc2EAAAADAQABAAABAQ<snip>ooooWgJfN/LHp hiroom2@ubuntu-16
ユーザ認証をHTTPに変更します。
$ diff -uprN /etc/gerrit/gerrit.config{.org,}
--- /etc/gerrit/gerrit.config.org       2016-07-28 00:24:10.609299708 +0900
+++ /etc/gerrit/gerrit.config   2016-07-28 00:24:24.629195859 +0900
@@ -7,7 +7,7 @@
 [index]
        type = LUCENE
 [auth]
-       type = DEVELOPMENT_BECOME_ANY_ACCOUNT
+       type = HTTP
 [sendemail]
        smtpServer = localhost
 [sshd]
gerritを再起動します。
$ sudo systemctl restart gerrit
ブラウザから以下のURLへアクセスします。
http://<server>/gerrit
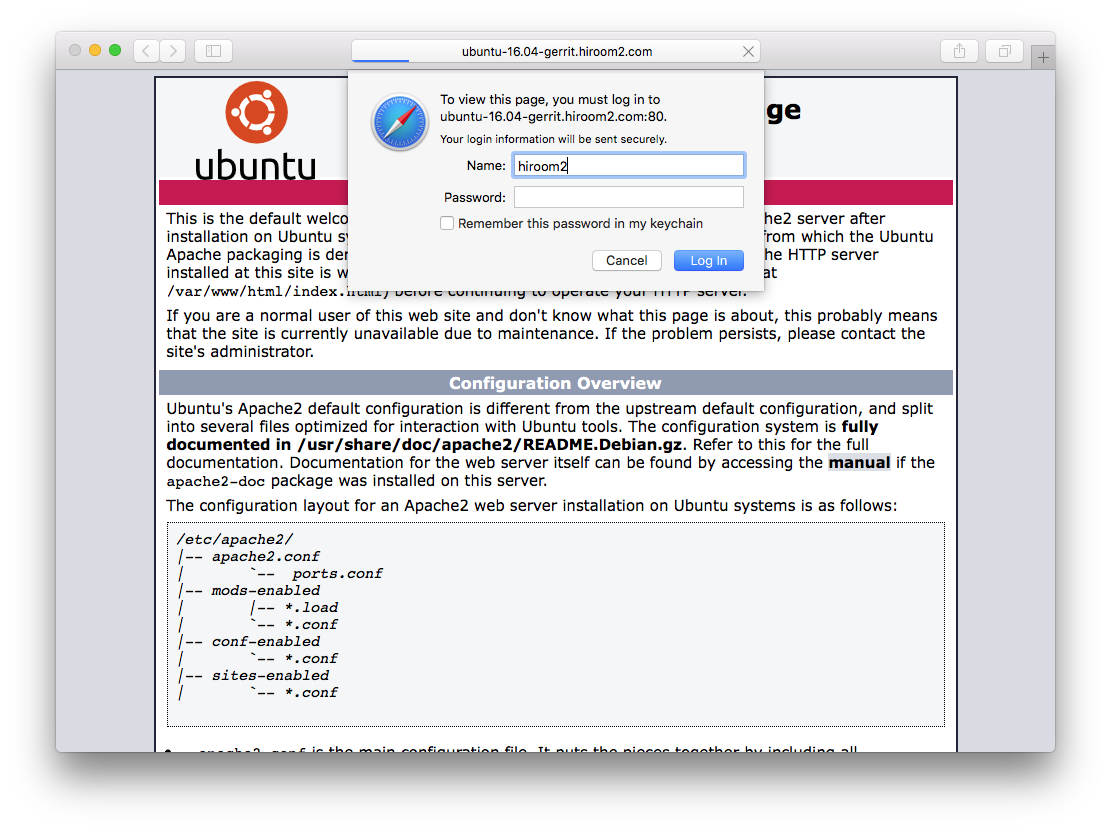
ダイジェスト認証のダイアログが開きます。htdigestで作成したユーザ名とパスワードを入力します。
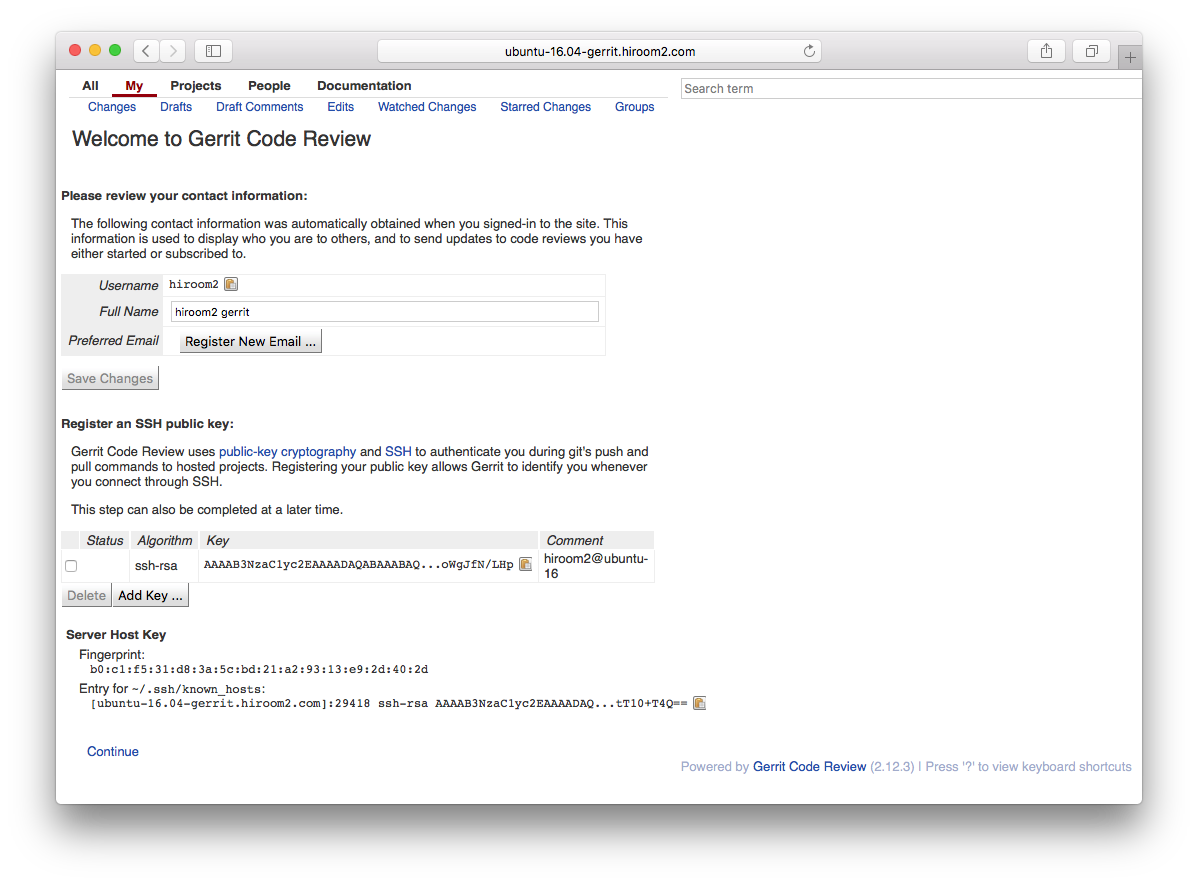
フルネームとSSHの公開鍵を登録します。フルネームはユーザ名とは別のものにする必要があります。なお、仕様なのか、HTTP経由だとemailの登録はできません。後ほどSSH経由で登録します。
ユーザ認証をDEVELOPMENT_BECOME_ANY_ACCOUNTに変更します。
$ diff -uprN /etc/gerrit/gerrit.config{.org,}
--- /etc/gerrit/gerrit.config.org       2016-07-28 00:37:43.171990767 +0900
+++ /etc/gerrit/gerrit.config   2016-07-28 00:39:11.763461918 +0900
@@ -7,7 +7,7 @@
 [index]
        type = LUCENE
 [auth]
-       type = HTTP
+       type = DEVELOPMENT_BECOME_ANY_ACCOUNT
 [sendemail]
        smtpServer = localhost
 [sshd]
gerritを再起動します。
$ sudo systemctl restart gerrit
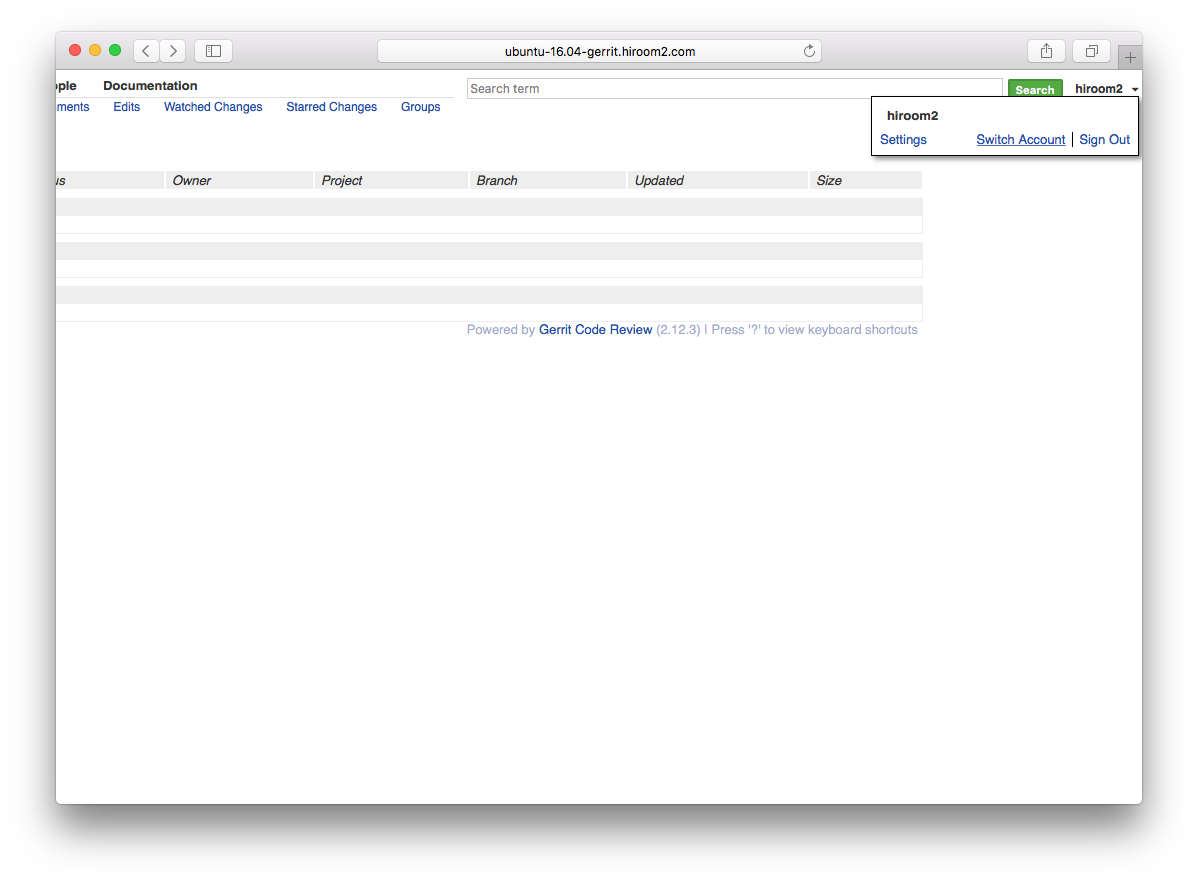
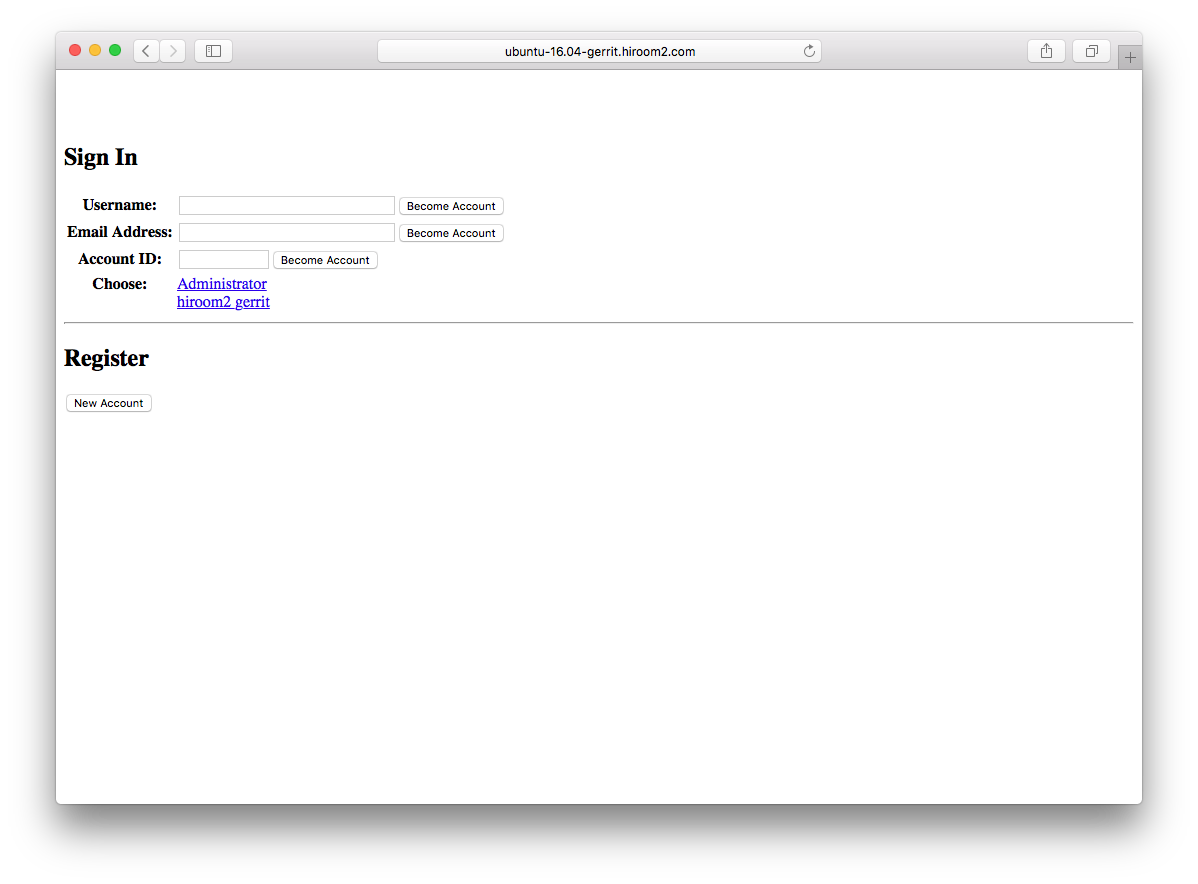
ブラウザをリロードし、右上のユーザ名からSwitch Accountを選択します。
Administratorを選択します。
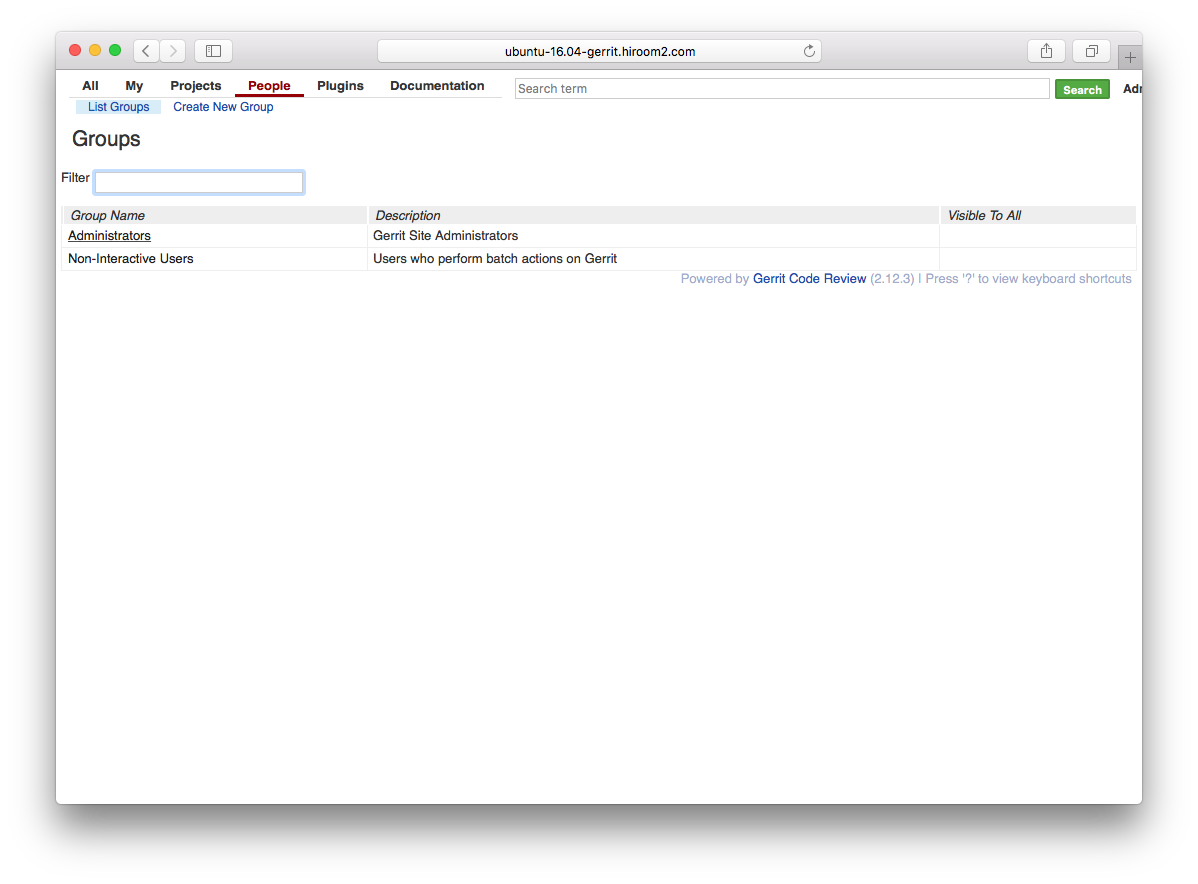
上のメニューからPeopleのList Groupsを選択します。
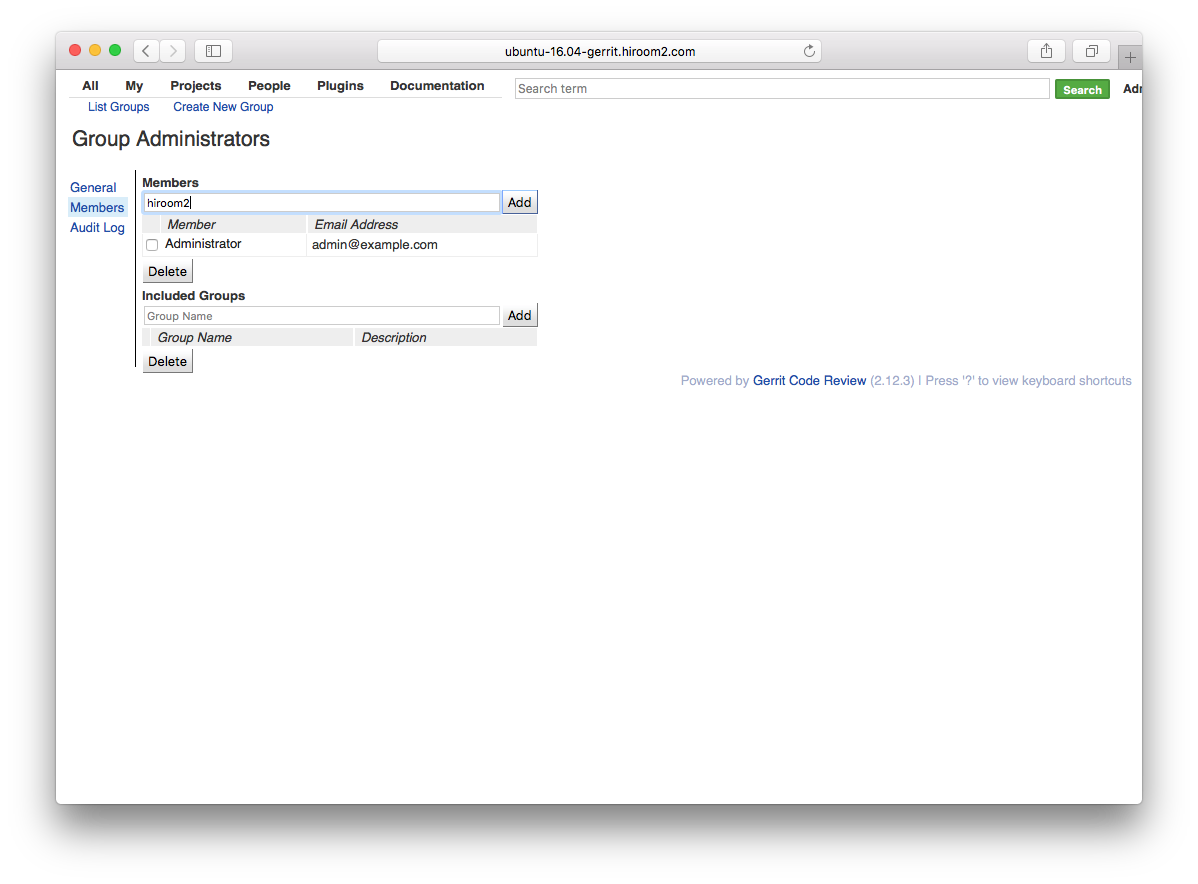
Administratorsグループに先ほど作成したユーザを追加します。
ユーザ認証をHTTPに変更します。
$ diff -uprN /etc/gerrit/gerrit.config{.org,}
--- /etc/gerrit/gerrit.config.org       2016-07-28 00:39:38.915300824 +0900
+++ /etc/gerrit/gerrit.config   2016-07-28 00:40:21.187050856 +0900
@@ -7,7 +7,7 @@
 [index]
        type = LUCENE
 [auth]
-       type = DEVELOPMENT_BECOME_ANY_ACCOUNT
+       type = HTTP
 [sendemail]
        smtpServer = localhost
 [sshd]
gerritを再起動します。
$ sudo systemctl restart gerrit
SSH経由でemailを登録します。
$ # ssh -p 29418 <server> gerrit set-account --add-email <mail> <user>
$ # ssh -p 29418 <server> gerrit set-account --preferred-email <mail> <user>
$ ssh -p 29418 ubuntu-16.04-gerrit.hiroom2.com gerrit set-account \
--add-email "hiroom2@ubuntu-16.04-client.hiroom2.com" hiroom2
$ ssh -p 29418 ubuntu-16.04-gerrit.hiroom2.com gerrit set-account \
--preferred-email "hiroom2@ubuntu-16.04-client.hiroom2.com" hiroom2
ただいま作成した管理ユーザを用いれば、これ以降の管理ユーザはHTTP/DEVELOPMENT_BECOME_ANY_ACCOUNTの切り替え不要です。
コミッタやレビュアのようにHTTPアクセスが必要なユーザは以下のように作成します。
- ユーザ名とパスワードをダイジェスト認証のファイルに追加する
- 追加したユーザ名とパスワードを用いてHTTP経由でgerritサーバにアクセスし、ユーザを作成する
- SSH経由でユーザのemailを更新する
Jenkinsのように外部からSSH経由のみでアクセスするユーザは以下のように作成します。
- SSH経由でユーザを作成する
3 gerritクライアントの設定
Ubuntu 16.04でgerritサーバへパッチを送信する為の設定を記載します。
3.1 no matching key exchange method found. Their offer: diffie-hellman-group1-sha1
gerritはSSHの暗号化にdiffie-hellman-group1-sha1を使おうとする一方、 OpenSSH 7から古い暗号化がデフォルトで無効になっており、OpenSSH 7クライアントとgerritサーバのSSH接続が失敗してしまいます。
$ # OpenSSH 7 client
$ ssh -p 29418 ubuntu-16.04-gerrit.hiroom2.com gerrit
Unable to negotiate with 192.168.11.86 port 29418: no matching key
exchange method found. Their offer: diffie-hellman-group1-sha1
クライアント側の.bashrcで以下の様なaliasを実行します。
alias ssh='ssh -oKexAlgorithms=+diffie-hellman-group1-sha1'
あるいはクライアント側の.ssh/configにてgerritのサーバはdiffie-hellman-group1-sha1を使用するようにします。
$ cat .ssh/config
Host ubuntu-16.04-gerrit.hiroom2.com
  KexAlgorithms +diffie-hellman-group1-sha1
3.2 git-reviewのインストール
gerritサーバにパッチを送信するgit-reviewをクライアント側でインストールします。
$ sudo apt-get install -y git-review
4 新規プロジェクトの追加
以下のコマンドにてSSH経由でプロジェクトを作成できます。既存リポジトリをインポートしない場合は–empty-commitが必要です。
ssh -p 29418 <server> gerrit create-project --empty-commit <name> \
--description "'<desc>'"
SSH経由でnew-projectというプロジェクトを作成します。
$ ssh -p 29418 ubuntu-16.04-gerrit.hiroom2.com gerrit create-project \
--empty-commit new-project.git --description "'Create project from SSH command'"
プロジェクトのリポジトリのURLは以下の通りです。
$ # http://<server>/gerrit/<name>.git
$ # ssh://<server>:29418/<name>.git
HTTP経由でgit cloneします。
$ git clone http://ubuntu-16.04-gerrit.hiroom2.com/gerrit/new-project.git
$ cd new-project
git-review用の設定ファイルの.gitreviewを作成します。hostとprojectをご自分の環境のものに変更してください。
$ cat <<EOF > .gitreview
[gerrit]
host=ubuntu-16.04-gerrit.hiroom2.com
port=29418
project=new-project
defaultbranch=master
EOF
新規ファイル追加等のgitでの作業を実行します。
$ echo hello > hello.txt
$ git add hello.txt
$ git commit -m "Hello, World"
git-review実行前のgit logは以下の通りです。
$ git log
commit e2b5070e2cdc576a2e669366f85797ebfdc29b49
Author: hiroom2 gerrit <hiroom2@ubuntu-16>
Date:   Thu Jul 28 05:29:51 2016 +0900

    Hello, World

commit bc9d23cb95c8d94ae8e3544bac512c4210c7c443
Author: hiroom2 gerrit <hiroom2@ubuntu-16.04-gerrit.hiroom2.com>
Date:   Thu Jul 28 05:25:49 2016 +0900

    Initial empty repository
git-reviewを実行します。
$ git review # or git review -R
Creating a git remote called "gerrit" that maps to:
        ssh://hiroom2@ubuntu-16.04-gerrit.hiroom2.com:29418/new-project
Your change was committed before the commit hook was installed.
Amending the commit to add a gerrit change id.
remote: Processing changes: new: 1, refs: 1, done
remote:
remote: New Changes:
remote:   http://ubuntu-16.04-gerrit.hiroom2.com/gerrit/1 Hello, World
remote:
To ssh://hiroom2@ubuntu-16.04-gerrit.hiroom2.com:29418/new-project
 * [new branch]      HEAD -> refs/publish/master
git-review実行後のgit logは以下のとおりです。先ほどのコミットメッセージにChange-Idが追加されています。これはgerrit上でコミットを管理するのに使われる識別子です。
$ git log
commit 2fc75bd27f6bb323ad19a39b74c68b5faafac848
Author: hiroom2 gerrit <hiroom2@ubuntu-16>
Date:   Thu Jul 28 05:29:51 2016 +0900

    Hello, World

    Change-Id: I965523a134ac6bfaae91491bc7d53d153a93e3d2

commit bc9d23cb95c8d94ae8e3544bac512c4210c7c443
Author: hiroom2 gerrit <hiroom2@ubuntu-16.04-gerrit.hiroom2.com>
Date:   Thu Jul 28 05:25:49 2016 +0900

    Initial empty repository
なお、このChange-Idはgit-review実行時にダウンロードされたgerrit用の.git/hooks/commit-msgが付加しています。すでに別の.git/hooks/commit-msgを使用している場合はgit-review実行時にgerrit用の.git/hooks/commit-msgはダウンロードされず、Change-Idは付与されません。その場合は以下のURLからgerrit用の.git/hooks/commit-msgをダウンロードし、commit-msg以外の名前にします。
$ # wget http://<server>/gerrit/tools/hooks/commit-msg
$ wget http://ubuntu-16.04-gerrit.hiroom2.com/gerrit/tools/hooks/commit-msg
$ mv commit-msg .git/hooks/commit-msg_gerrit
既存の.git/hooks/commit-msgも.git/hooks/commit-msg_xxxの名前に変更し、以下の様な.git/hooks/commit-msg_xxxを呼び出す.git/hooks/commit-msgを用意します。
$ cat .git/hooks/commit-msg
#!/bin/sh

for script in `ls ${0}_*`; do
  echo "Running ${script}"
  ${script} $@
  ret=$?
  if [ ${ret} -ne 0 ]; then
    echo "${script} is FAILED."
    exit ${ret}
  fi
done
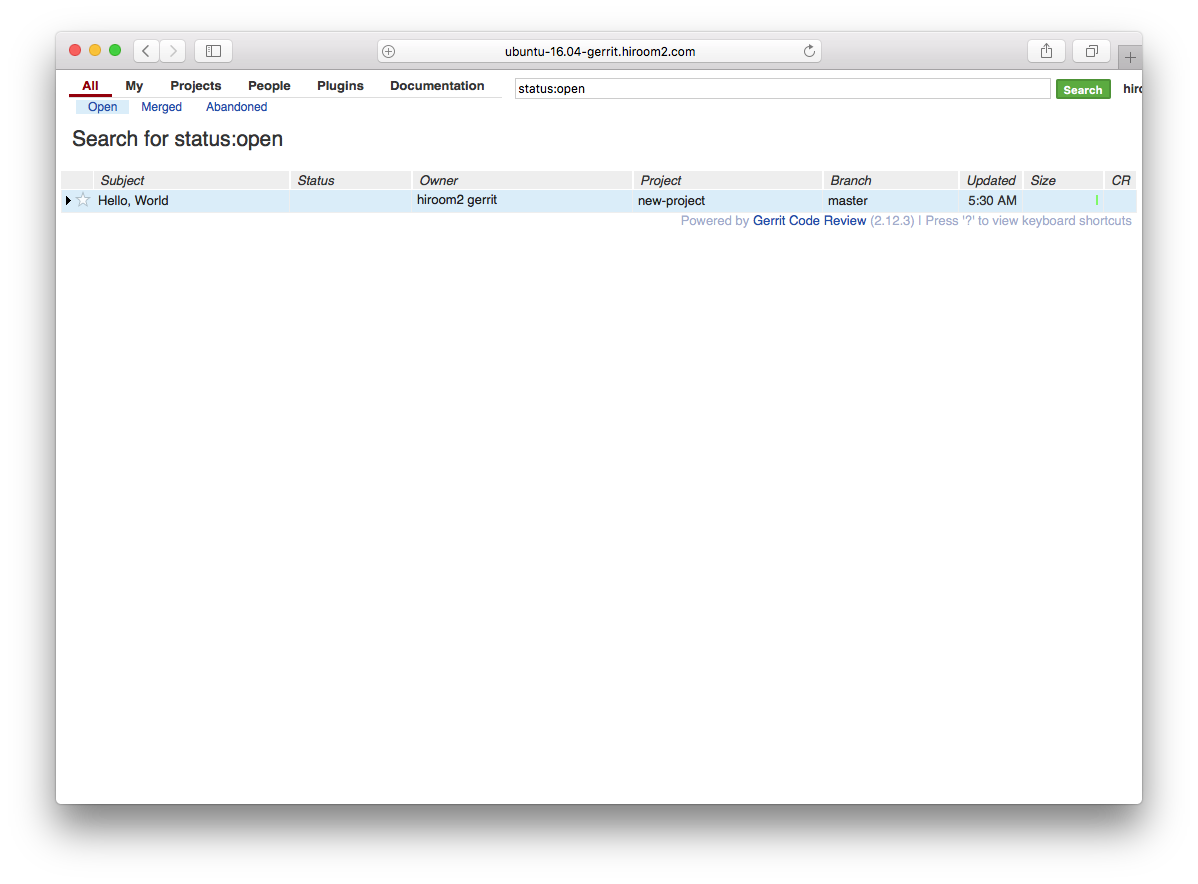
gerritのウェブページのメニューにて、AllのOpenを開きます。先ほどのコミットしたパッチが表示されます。
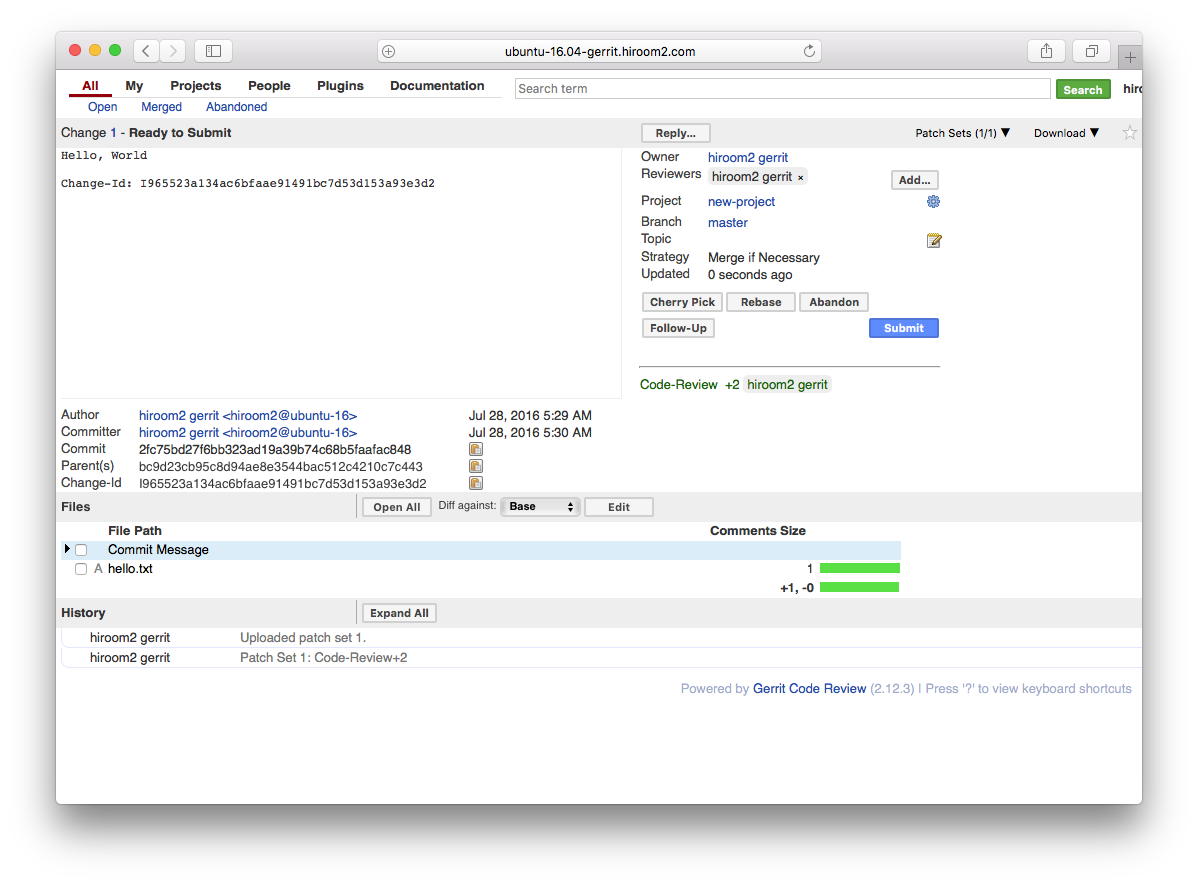
パッチを選択すると詳細画面が表示されます。この画面でパッチの内容を確認します。確認して問題があればAbandon、問題がなければCode-Review+2をクリックします。ここではCode-Review+2をクリックしています。
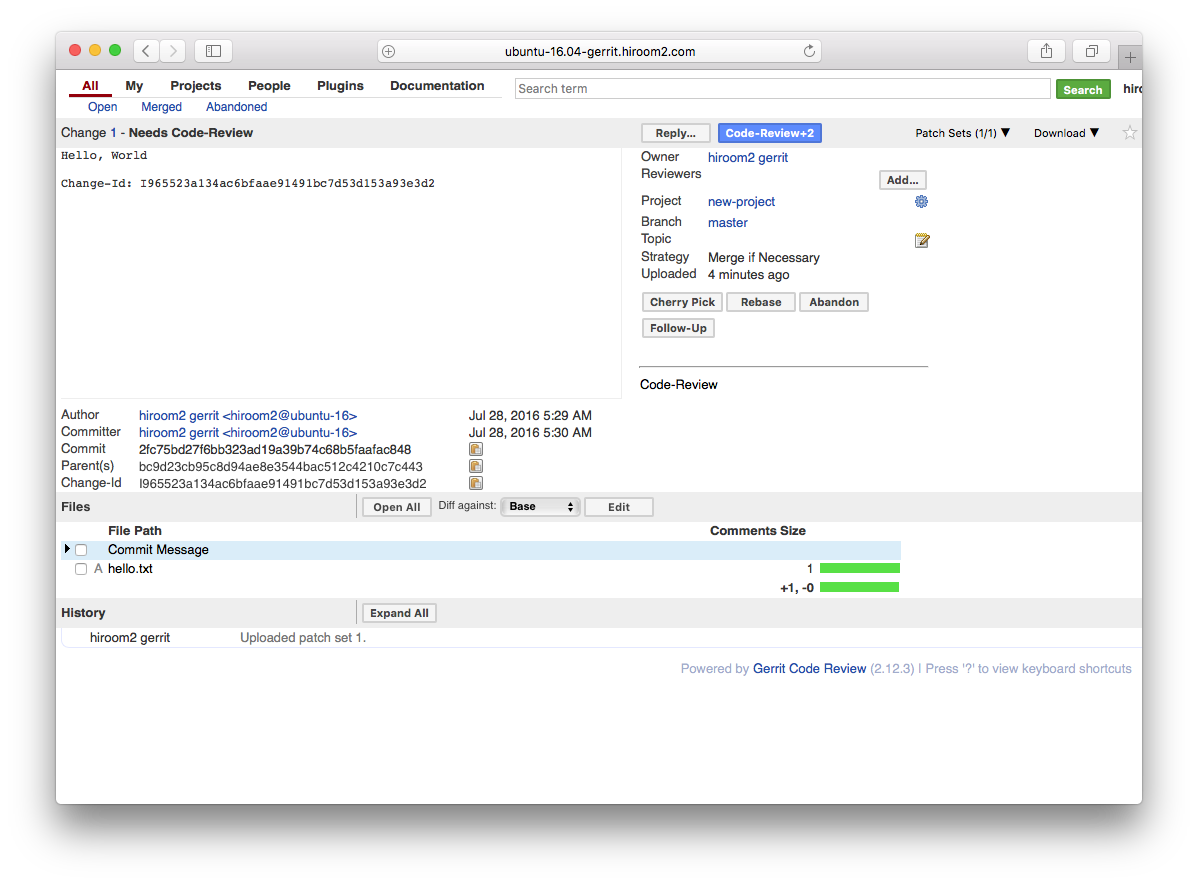
デフォルトだとCode-Reviewスコアは+2になるとSubmit可能になります。Submitするとリポジトリにパッチがプッシュされます。
5 既存リポジトリを利用する
–empty-commitを指定せずにプロジェクトを作成します。
$ ssh -p 29418 ubuntu-16.04-gerrit.hiroom2.com gerrit create-project \
existing-project.git --description "'Create existing project from SSH command'"
既存リポジトリのベアリポジトリを作成します。
$ git clone --bare <path-to-repo>/existing-project.git
$ cd existing-project.git
ベアリポジトリをSSH経由で先ほど作成したプロジェクトにプッシュします。
$ git push ssh://ubuntu-16.04-gerrit.hiroom2.com:29418/existing-project.git *:*
これ以降はHTTP経由でgit cloneが可能となります。また、既存リポジトリとハッシュ値は同じになっています。
$ git clone http://ubuntu-16.04-gerrit.hiroom2.com/gerrit/existing-project.git
6 Jenkinsとの連携
Code-Review以外にVerifiedというスコアを追加して、JenkinsにVerifiedのスコアを自動でつけさせるようにします。Verifiedスコアを導入することで、コードレビュー前にパッチセットがビルドやテストを通るかどうかを確認できます。Verifiedスコアを導入した場合、Code-Reviewスコアが+2以上かつVerifiedスコアが+1以上になるとパッチセットをSubmitできるようになります。
ここでは先ほど追加した既存プロジェクトのexisting-projectを用います。
6.1 Verifiedスコアの導入
Code-ReviewスコアはCode-Reviewラベルで定義されています。レビューとは別にJenkinsのテスト結果をVerifiedスコアとして扱うVerifiedラベルを定義します。プロジェクトの雛形となるAll-ProjectsにVerifiedラベルを追加します。
メニューAllのOpenを選択し、All-Projectsを選択します。
Edit Project Configを選択します。
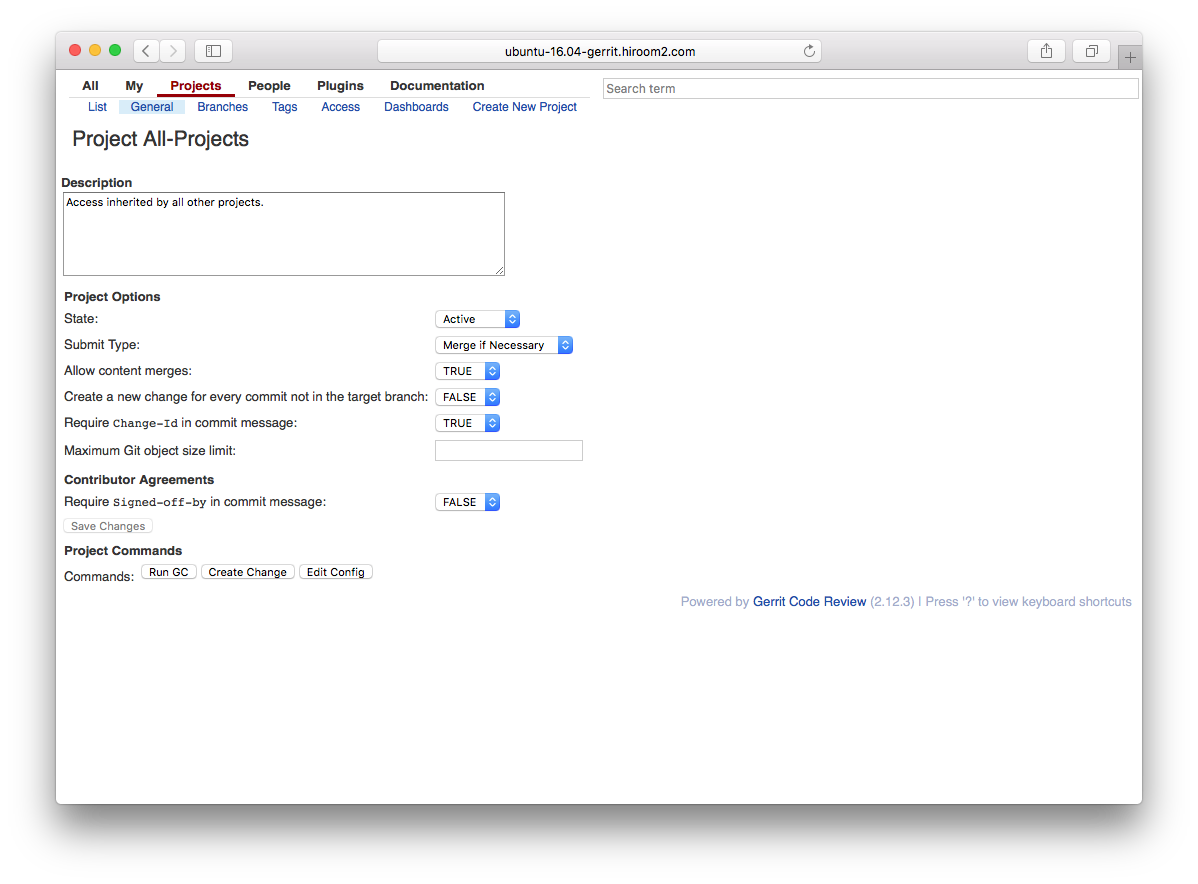
コンフィグファイルの編集画面が表示されます。
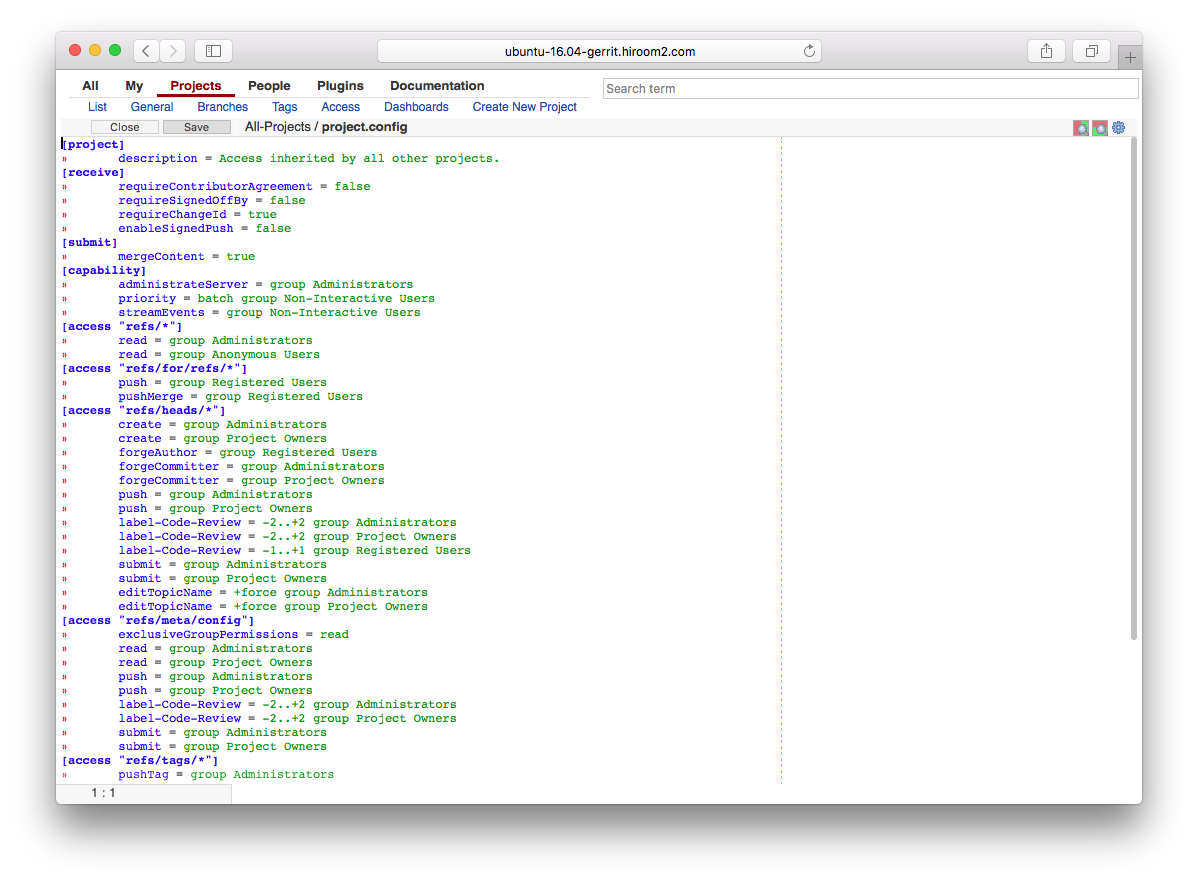
コンフィグファイルに以下の変更を加えます。
diff --git a/project.config b/project.config
index 2584f6b..919288d 100644
--- a/project.config
+++ b/project.config
@@ -28,6 +28,9 @@
        label-Code-Review = -2..+2 group Administrators
        label-Code-Review = -2..+2 group Project Owners
        label-Code-Review = -1..+1 group Registered Users
+       label-Verified = -1..+1 group Administrators
+       label-Verified = -1..+1 group Project Owners
+       label-Verified = -1..+1 group Registered Users
        submit = group Administrators
        submit = group Project Owners
        editTopicName = +force group Administrators
@@ -40,6 +43,8 @@
        push = group Project Owners
        label-Code-Review = -2..+2 group Administrators
        label-Code-Review = -2..+2 group Project Owners
+       label-Verified = -1..+1 group Administrators
+       label-Verified = -1..+1 group Project Owners
        submit = group Administrators
        submit = group Project Owners
 [access "refs/tags/*"]
@@ -57,3 +62,8 @@
        value =  0 No score
        value = +1 Looks good to me, but someone else must approve
        value = +2 Looks good to me, approved
+[label "Verified"]
+       function = MaxWithBlock
+       value = -1 Fails
+       value =  0 No score
+       value = +1 Verified
Publish Edit, Publish, Code-Review+2, Submitを選択していき、変更を反映します。

6.2 gerritのJenkins用ユーザの追加
Jenkinsが稼働しているサーバにてjenkinsユーザでSSH公開鍵を作成します。
$ sudo su - jenkins
$ ssh-keygen -t rsa
Generating public/private rsa key pair.
Enter file in which to save the key (/var/lib/jenkins/.ssh/id_rsa):
Enter passphrase (empty for no passphrase):
Enter same passphrase again:
Your identification has been saved in /var/lib/jenkins/.ssh/id_rsa.
Your public key has been saved in /var/lib/jenkins/.ssh/id_rsa.pub.
<snip>
Administratorグループに所属するユーザのSSH経由でgerritにjenkins用のユーザを作成し、先ほど作成したjenkinsユーザの公開鍵を登録します。
$ cat id_rsa.pub | ssh -p 29418 ubuntu-16.04-gerrit.hiroom2.com gerrit \
create-account --ssh-key - --group "'Administrators'" \
--full-name "'jenkins gerrit'" \
--email "'jenkins@ubuntu-16.04-jenkins.hiroom2.com'" jenkins
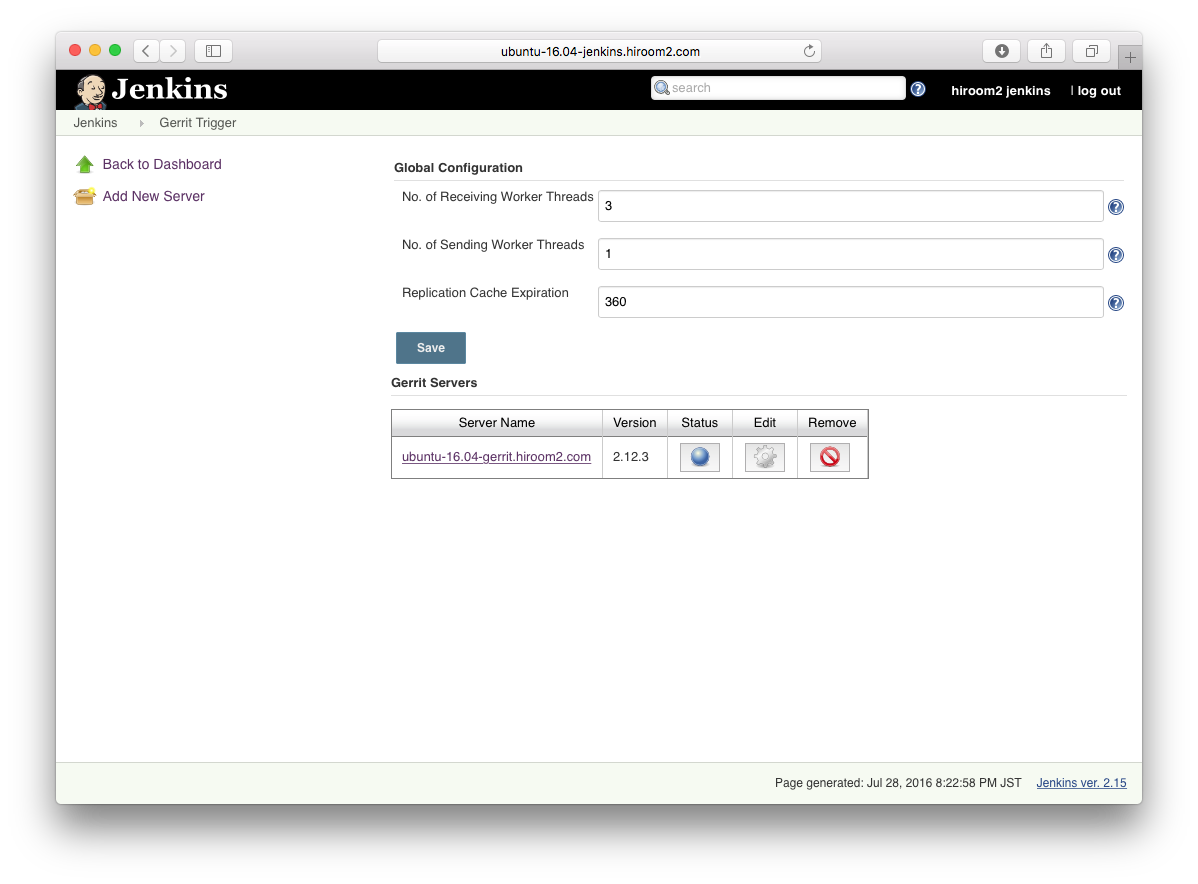
6.3 JenkinsのGerrit Trigger Pluginの設定
git-reviewが実行された延長線上でJenkins上でテストを実行し、Verifiedスコアをgerritに反映するプラグインです。Jenkinsのプラグイン管理画面からGerrit Trigger Pluginを導入してください。
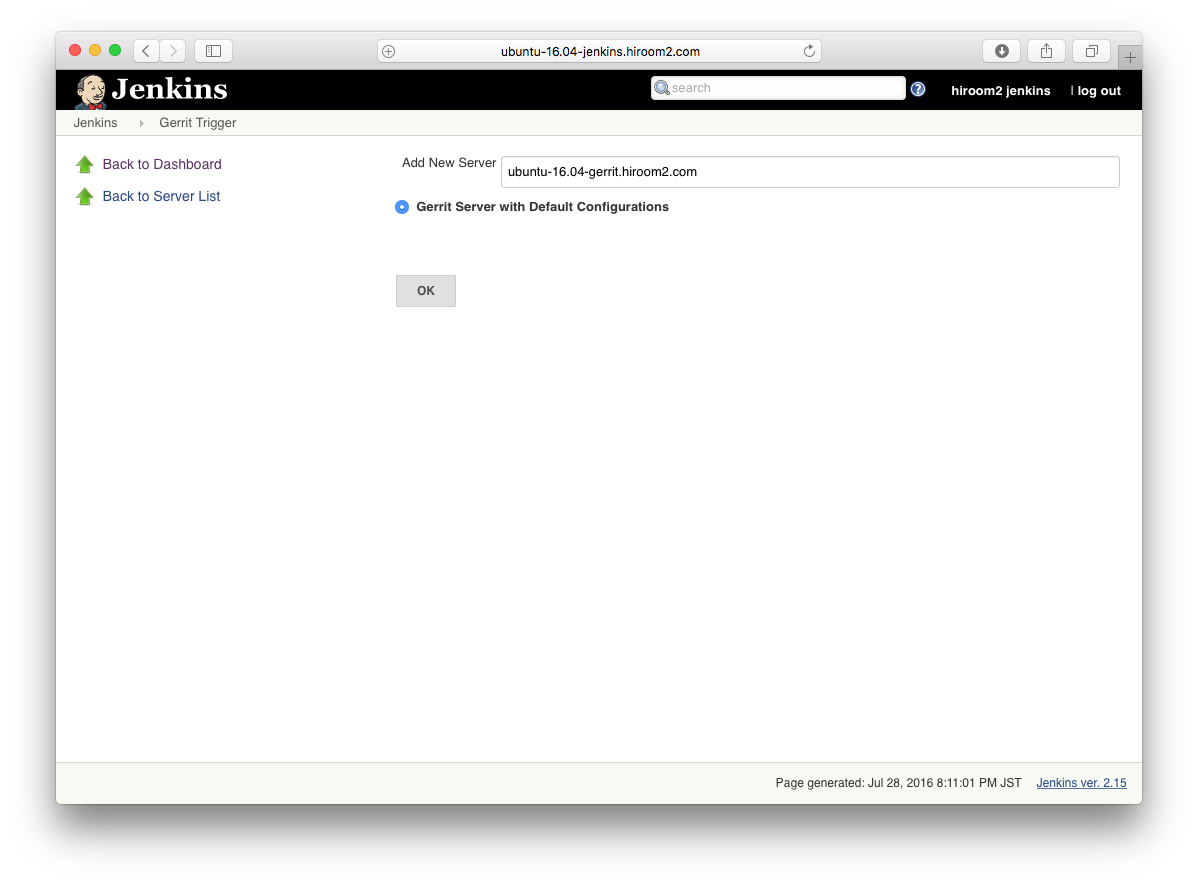
Gerrit Trigger Pluginの設定画面を開きます。
Manage Jenkins -> Gerrit Trigger
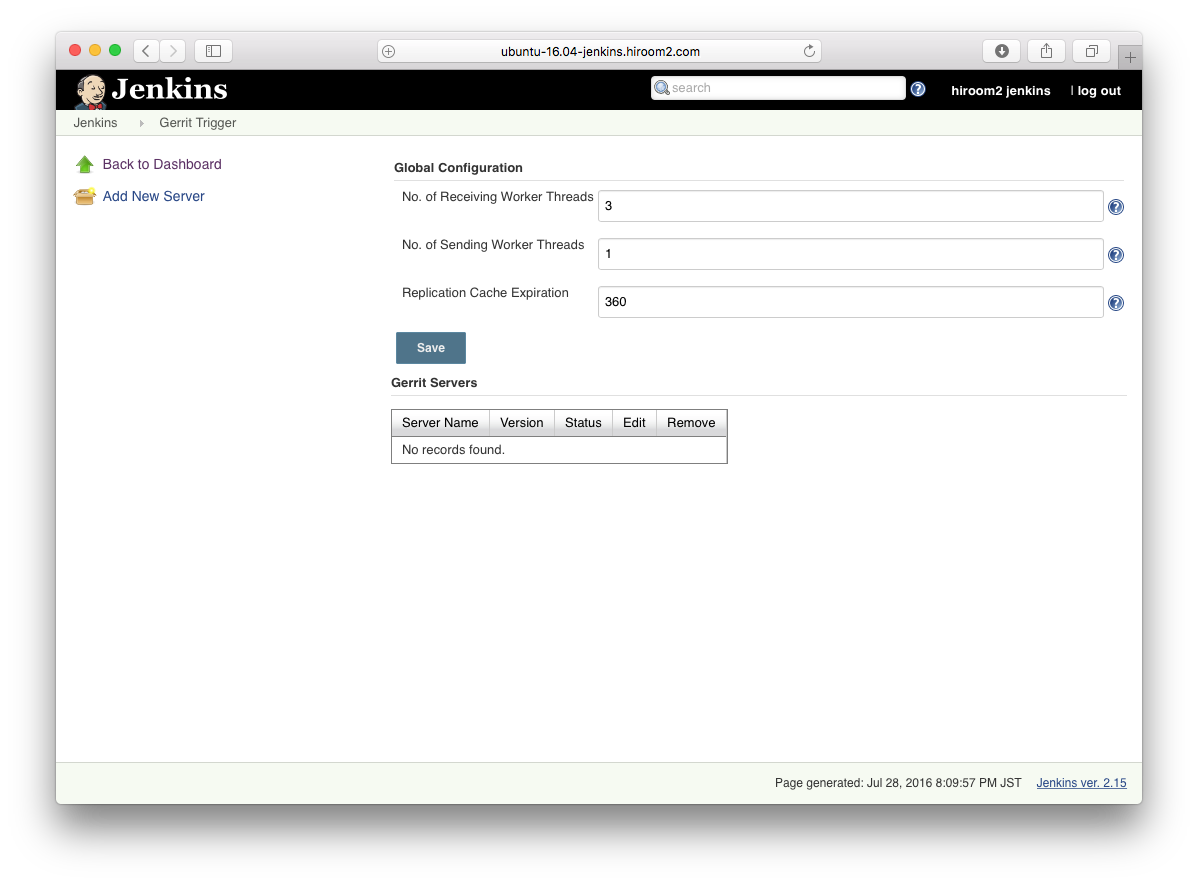
Jenkinsで扱うgerritサーバの名前を入力します。
Hostnameにサーバのホスト名を, Frontend URLにgerritサーバのURLを、Usernameにjenkinsを入力します。
http://<server>/gerrit # Frontend URL
Test Connectionで接続を確認できます。Saveします。
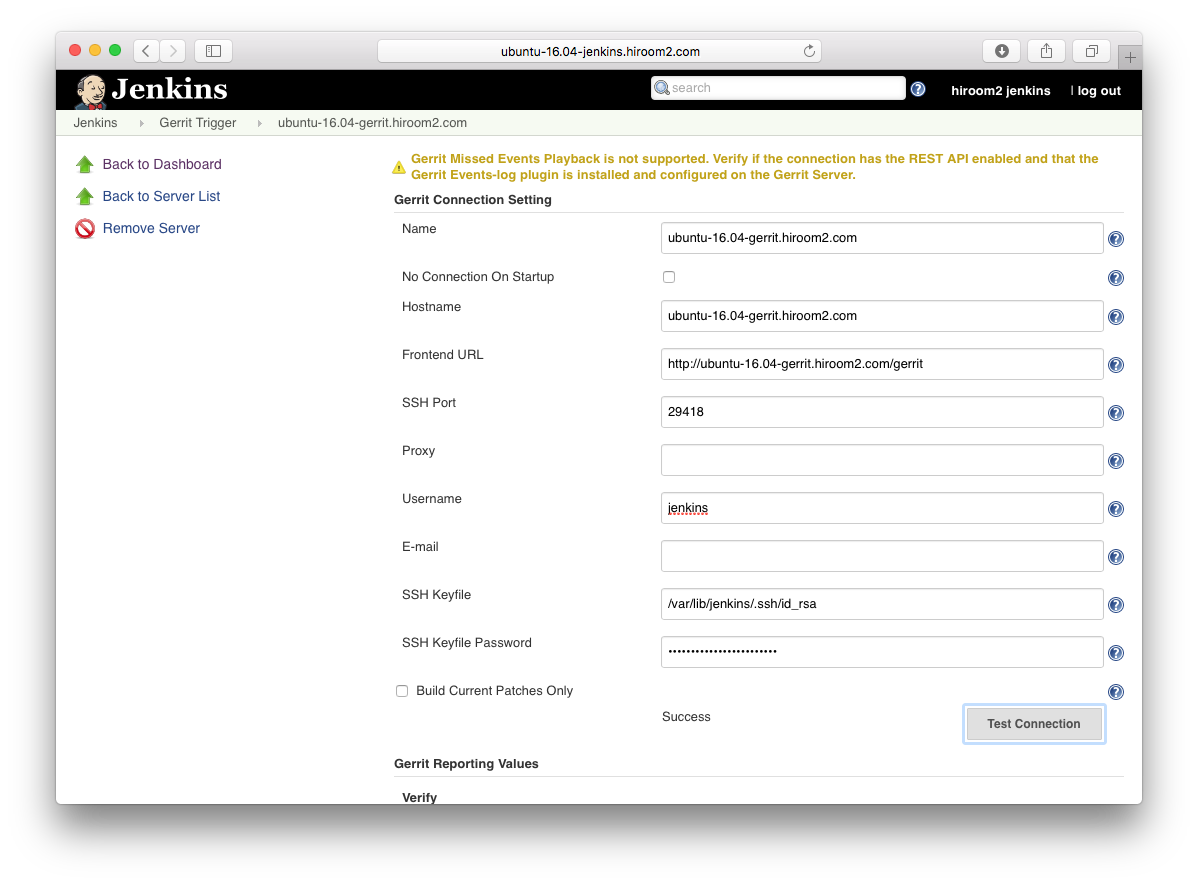
gerritサーバの一覧で、先ほど追加したサーバのStatusをクリックします。赤色から青色に変更すれば設定は成功です。
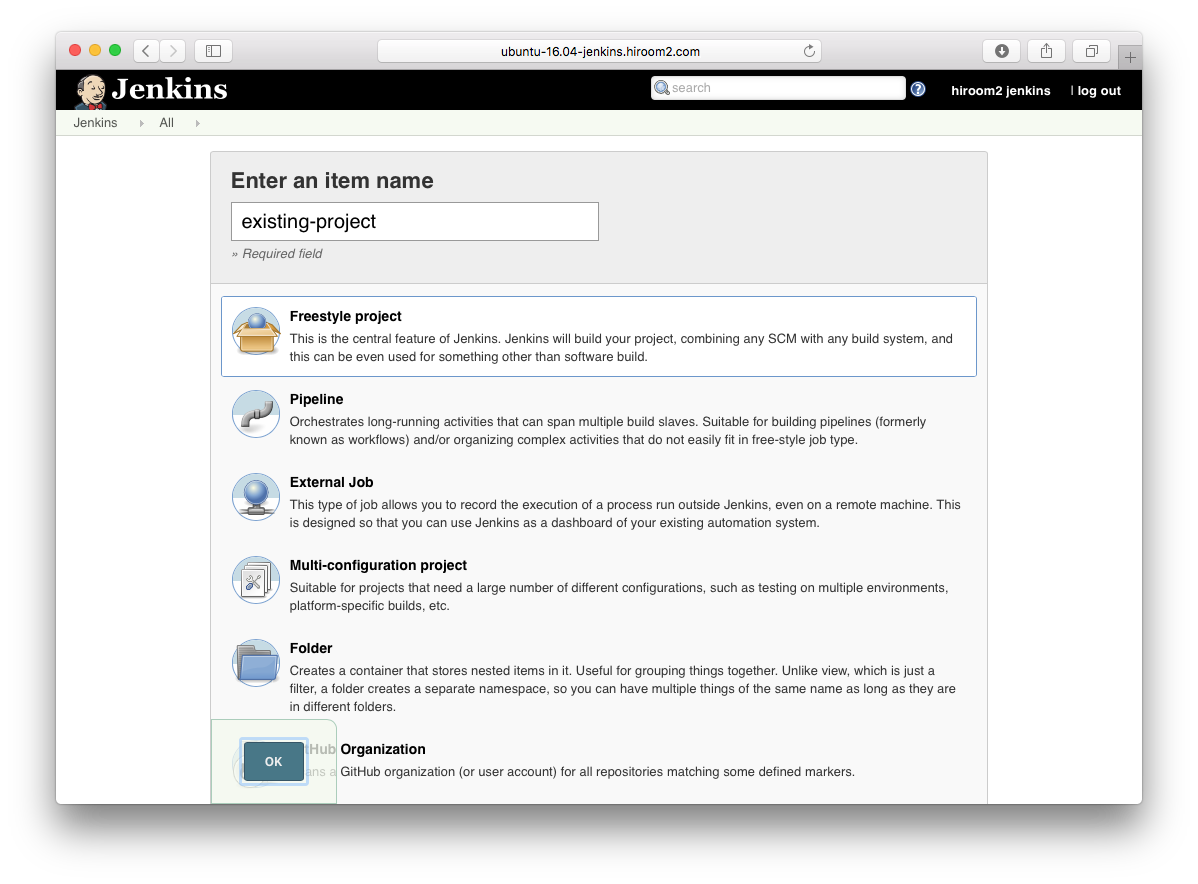
New ItemからGerrit Trigger Pluginを使用するプロジェクトを新規作成します。
Freestyle projectをベースにしてプロジェクトを作成します。
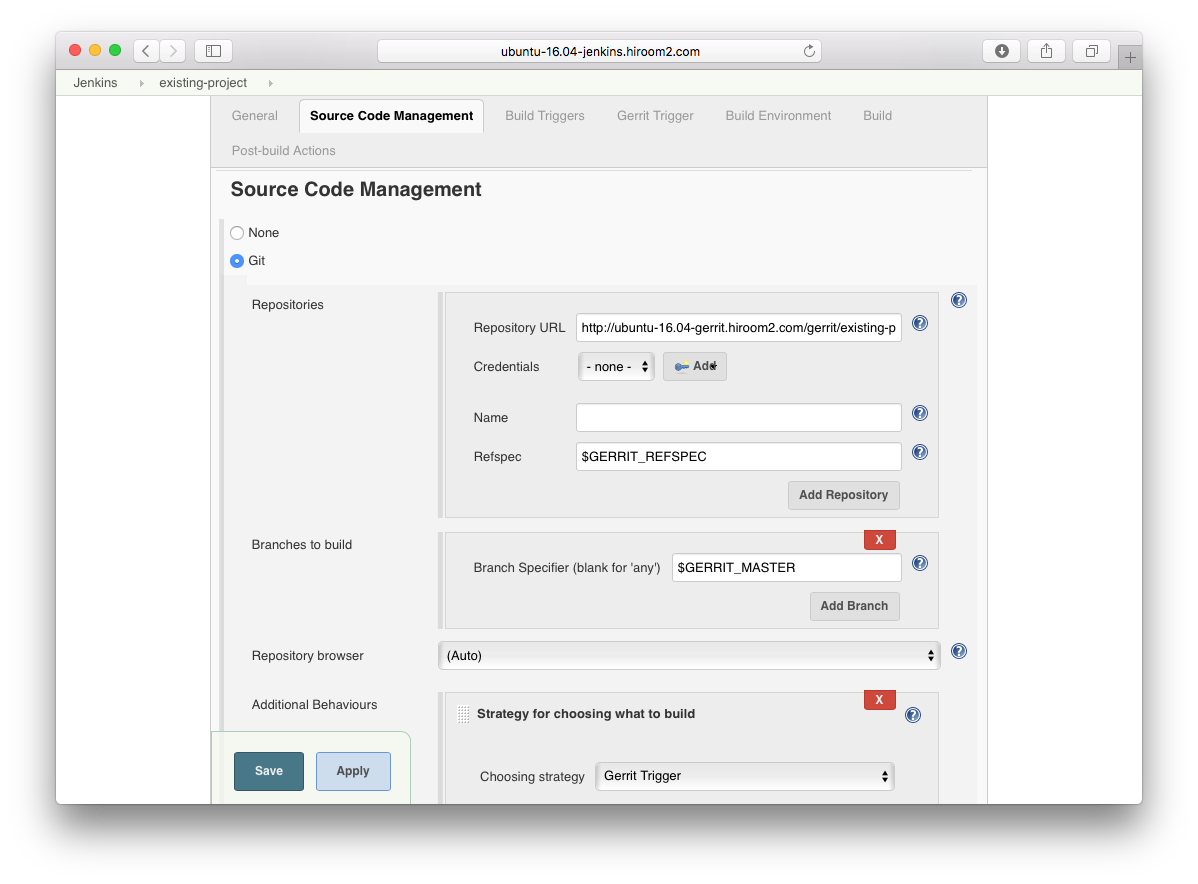
Source Code Managementでgitを選択します。
- Repository URLにgerritで作成したプロジェクトのリポジトリのURLを設定します
- AdvancedをクリックしてRefspecに$GERRIT_REFSPECを設定します
- Add BranchをクリックしてBranch Specifierに$GERRIT_MASTERを設定します
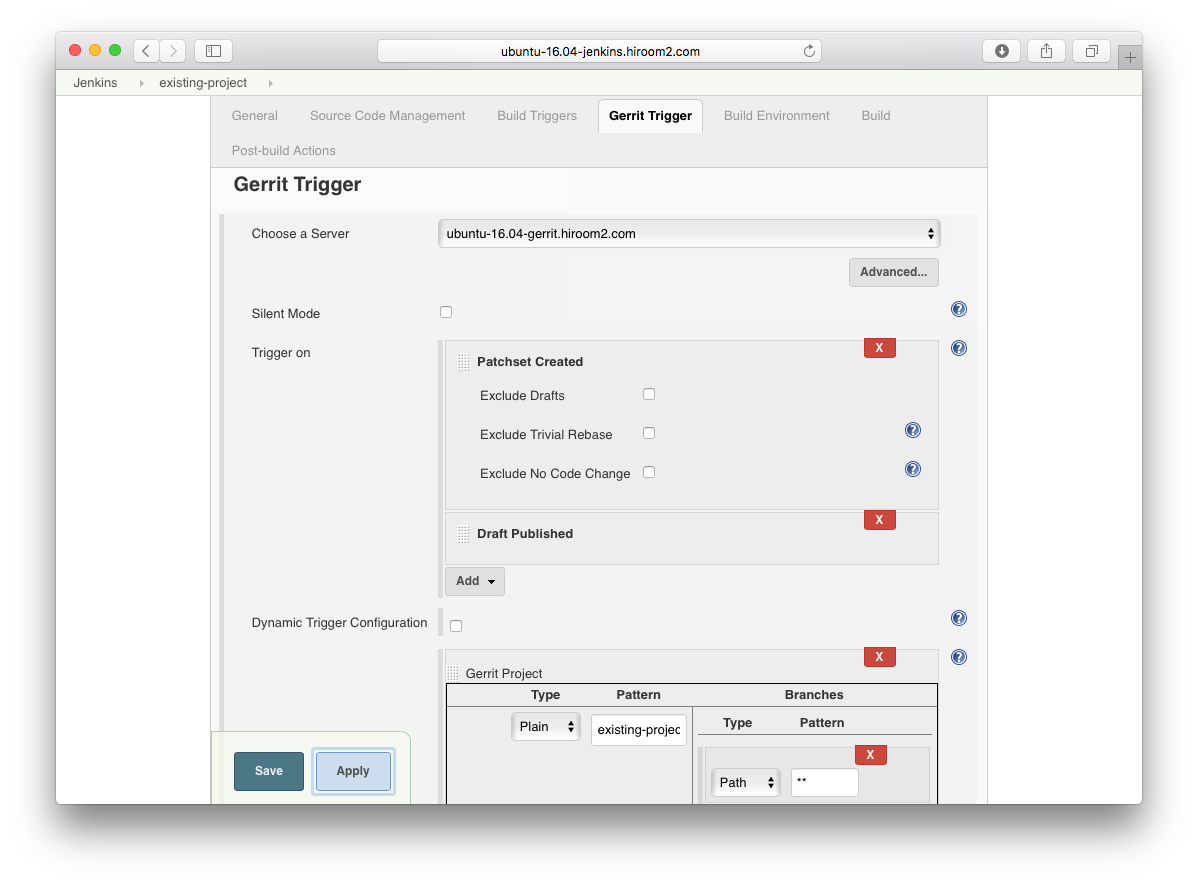
Build TriggersでGerrit eventにチェックを入れます。
- Choose a Serverに先ほど追加したgerritサーバを設定します
- Trigger onでPatchset CreatedとDraft Publishedを追加します
- Gerrit Projectで、TypeにPlainを、Patternにgerritで作成したプロジェクトの名前を設定します
- Gerrit ProjectのBranchesで、TypeをPathに、Patternを**に設定します
6.4 動作確認
パッチセットをgerritに送信して、Jenkinsとの連携を確認します。
existing-projectをクローンします。
$ git clone http://ubuntu-16.04-gerrit.hiroom2.com/gerrit/existing-project.git
$ cd existing-project
existing-project用の.gitreviewを作成します。
$ cat <<EOF > .gitreview
[gerrit]
host=ubuntu-16.04-gerrit.hiroom2.com
port=29418
project=existing-project
defaultbranch=master
EOF
新規ファイルを追加してコミットします。
$ echo hello > hello.txt
$ git add hello.txt
$ git commit -m "Hello, World"
git-reviewでパッチセットをgerritサーバへ送信します。
$ git review -R
Creating a git remote called "gerrit" that maps to:
        ssh://hiroom2@ubuntu-16.04-gerrit.hiroom2.com:29418/existing-project
Your change was committed before the commit hook was installed.
Amending the commit to add a gerrit change id.
remote: Processing changes: new: 1, refs: 1, done
remote:
remote: New Changes:
remote:   http://ubuntu-16.04-gerrit.hiroom2.com/gerrit/2 Hello, World
remote:
To ssh://hiroom2@ubuntu-16.04-gerrit.hiroom2.com:29418/existing-project
 * [new branch]      HEAD -> refs/publish/master
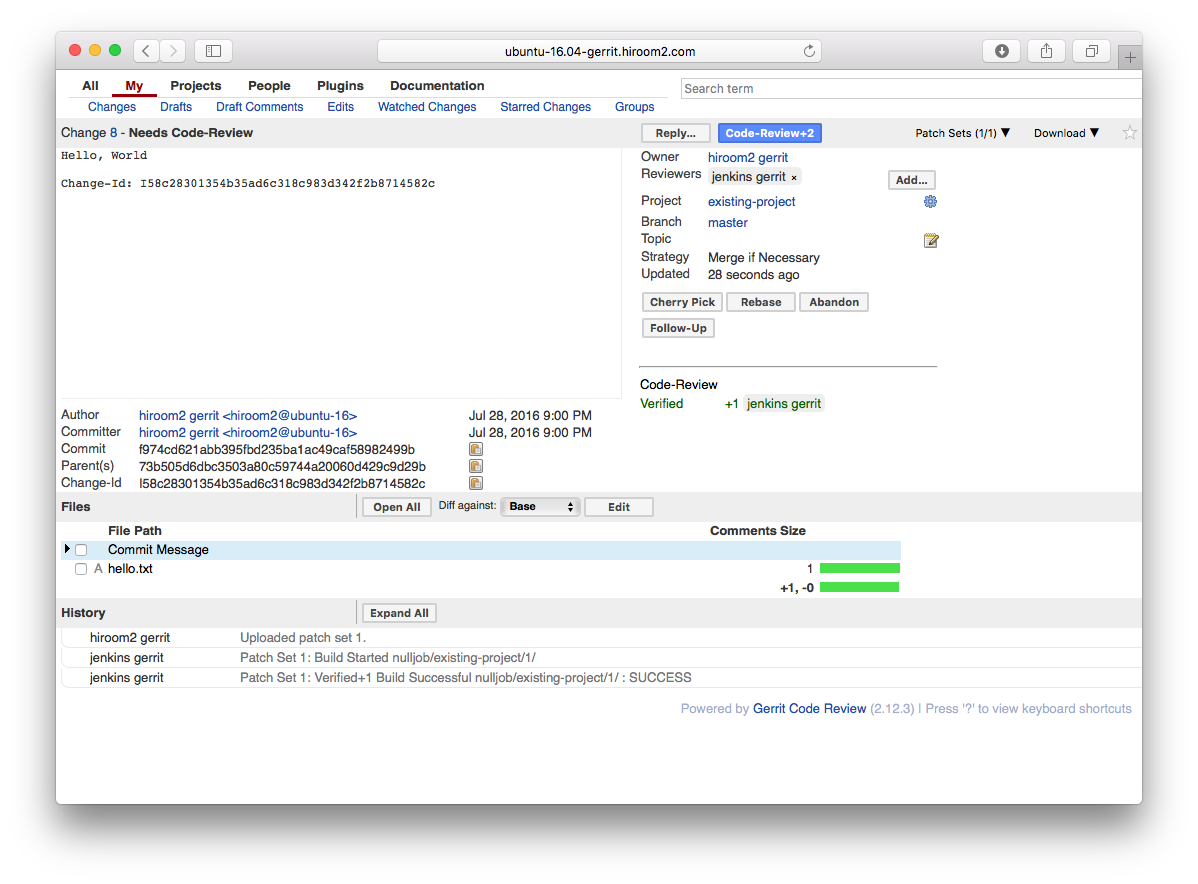
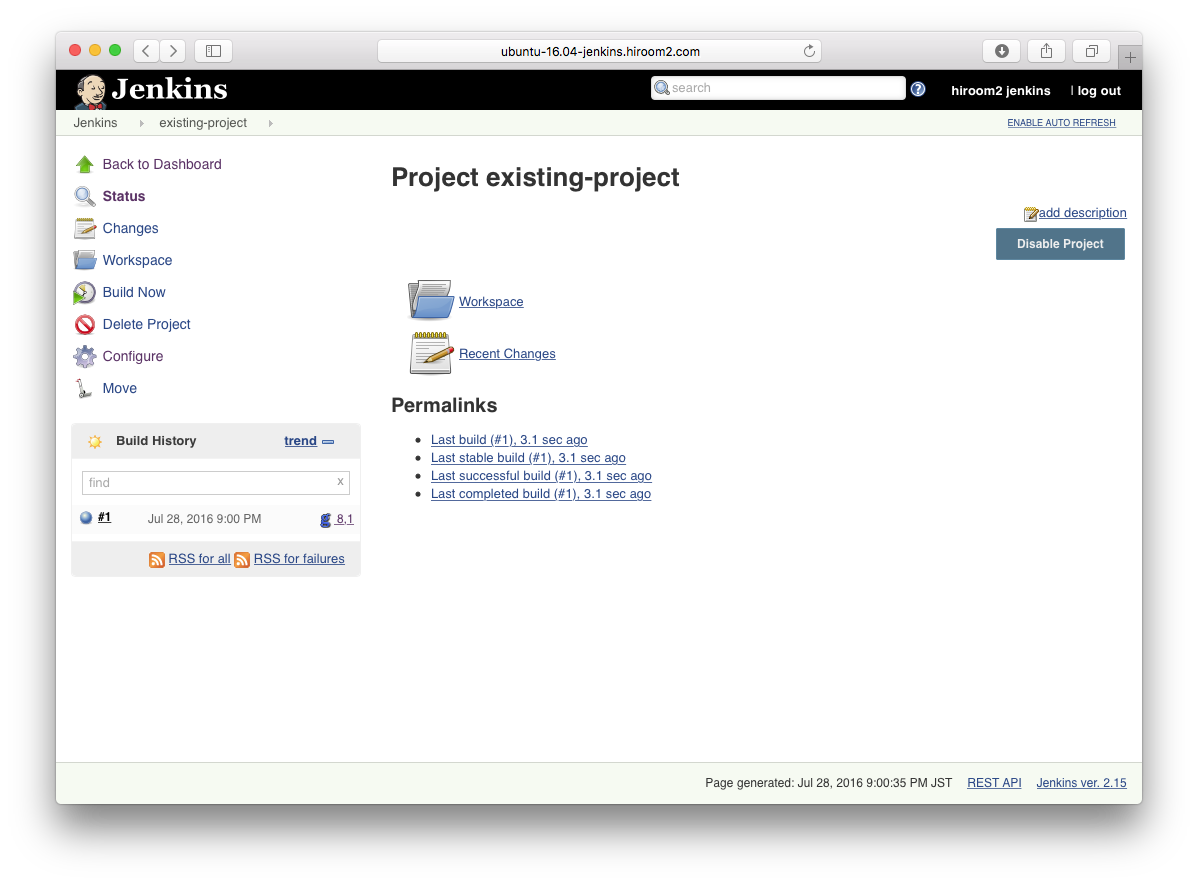
Jenkisのビルド履歴にGerrit Trigger Pluginによるビルドの履歴が表示されました。
gerritサーバのパッチセットの管理画面でjenkinsによってVerifiedスコアが反映されました。あとはコードレビューしてCode-Reviewスコアを+2すればSubmit可能になります。